Arts Integrated Lessons
Here are lessons that I will use in my classroom, which integrate the arts.
Andy Warhol: Pop Art
Teacher: Jo Anne Sula
Title of Lesson: Andy Warhol: Pop Art
Grade Level: 2-5
Time: (30 minutes)
Before Class: Cut brightly colored paper (4 colors) to desired sizes (an 8x11 cut into fourths).
Standards & Benchmarks: F.A. 3.1.2: Uses a variety of art & technology media to create an original work of art.
Introduction & Session Instructions
Introductions & Greeting (10 minutes):
- Pass out brightly colored paper to each student (4 sheets, 4 different colors).
- Inform them that it is for the activity we will do.
- Instruct them to not touch the paper until told to do so.
- Ask if anyone knows or has heard of Andy Warhol.
Session Instructions:
- Andy Warhol and Pop Art.
- Facilitate discussion to engage students.
- Show examples of Warhol’s work and have students share their thoughts.
- Compare and contrast Warhol’s pop art with non-pop art.
Mini-Lesson & Create
Connect and cite one example (from previous class/knowledge):
- Recently learned about the Solar System.
- Include pop art example of astronaut on the moon (“Moonwalk”) and have students relate it.
Say what you’re going to teach (2 minutes):
- Today we’re going to learn about Andy Warhol and Pop Art.
Teach:
- PowerPoint presentation on Andy Warhol and Pop Art.
Active Engagement (8 minutes):
- Discussions throughout the PowerPoint presentation.
- Facilitate discussions through questions about the pictures and information being presented.
Create (10 minutes):
- Brightly colored paper (4 each, different colors; 8x11 cut into fourths) in front of each student.
- Placed on their desk before start of lesson. Instructed to not touch the paper until told to do so.
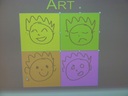
- Students will draw the face of their favorite person on each paper, with a different expression each time.
- Students are free to use crayons, colored pencils, etc. to create their pop art.
- Discuss various types of facial expressions and how to draw them.
- When done with all drawings, glue all four sheets to a white sheet of paper (8x11) to give pop art emphasis.
Closing:
Closing reflections on art creation: Show each students’ completed pop art to the class and compliment.
Closing reflections on teaching & overall lesson: My students used pencils and then outlined their drawings with sharpie. Using colored pencils could add more depth and color to their drawings. They all enjoyed the activity and had fun drawing various expressions on the faces.
Reflection & Notes:
This was my first time teaching an actual lesson in my field classroom. I was nervous and wasn’t sure if the students were going to understand the instructions of the activity, especially with drawing the varying expressions. An example really helped. I even created another example on the board to help them. They enjoyed creating their pop art as well as looking at what the rest of the class (including the teachers) have created.
Materials-- brightly colored paper (4 different colors, cut into fourths), white paper (8x11), glue, colored pencils, crayons, pencils, sharpie pens, computer
Title of Lesson: Andy Warhol: Pop Art
Grade Level: 2-5
Time: (30 minutes)
Before Class: Cut brightly colored paper (4 colors) to desired sizes (an 8x11 cut into fourths).
Standards & Benchmarks: F.A. 3.1.2: Uses a variety of art & technology media to create an original work of art.
Introduction & Session Instructions
Introductions & Greeting (10 minutes):
- Pass out brightly colored paper to each student (4 sheets, 4 different colors).
- Inform them that it is for the activity we will do.
- Instruct them to not touch the paper until told to do so.
- Ask if anyone knows or has heard of Andy Warhol.
Session Instructions:
- Andy Warhol and Pop Art.
- Facilitate discussion to engage students.
- Show examples of Warhol’s work and have students share their thoughts.
- Compare and contrast Warhol’s pop art with non-pop art.
Mini-Lesson & Create
Connect and cite one example (from previous class/knowledge):
- Recently learned about the Solar System.
- Include pop art example of astronaut on the moon (“Moonwalk”) and have students relate it.
Say what you’re going to teach (2 minutes):
- Today we’re going to learn about Andy Warhol and Pop Art.
Teach:
- PowerPoint presentation on Andy Warhol and Pop Art.
Active Engagement (8 minutes):
- Discussions throughout the PowerPoint presentation.
- Facilitate discussions through questions about the pictures and information being presented.
Create (10 minutes):
- Brightly colored paper (4 each, different colors; 8x11 cut into fourths) in front of each student.
- Placed on their desk before start of lesson. Instructed to not touch the paper until told to do so.
- Students will draw the face of their favorite person on each paper, with a different expression each time.
- Students are free to use crayons, colored pencils, etc. to create their pop art.
- Discuss various types of facial expressions and how to draw them.
- When done with all drawings, glue all four sheets to a white sheet of paper (8x11) to give pop art emphasis.
Closing:
Closing reflections on art creation: Show each students’ completed pop art to the class and compliment.
Closing reflections on teaching & overall lesson: My students used pencils and then outlined their drawings with sharpie. Using colored pencils could add more depth and color to their drawings. They all enjoyed the activity and had fun drawing various expressions on the faces.
Reflection & Notes:
This was my first time teaching an actual lesson in my field classroom. I was nervous and wasn’t sure if the students were going to understand the instructions of the activity, especially with drawing the varying expressions. An example really helped. I even created another example on the board to help them. They enjoyed creating their pop art as well as looking at what the rest of the class (including the teachers) have created.
Materials-- brightly colored paper (4 different colors, cut into fourths), white paper (8x11), glue, colored pencils, crayons, pencils, sharpie pens, computer
Magic Mud
Teacher: Jo Anne Sula
Workshop/Lesson: Magic Mud
Time: 45 minutes
Special Student Considerations: Students have autism or specific learning disabilities.
Standards: F.A.2.1.2: Use color to convey mood in works of art. F.A.3.1.3: Use observational skills in creating an original work of art.
Before Class: Prep a set of materials for each student (cup, newspaper, & toothpick). Teacher: food coloring, paper towels, measuring spoons.
Introduction & Session Instructions
Introductions & Greeting:
- Set up station with sets of materials ready for students to receive once ready to begin activity.
- Pass out worksheet with instructions to students.
- Introduce materials students will receive: a cup, a sheet of newspaper, and a toothpick to each student.
- Inform them that it is for the activity we will do.
- Instruct them to carefully follow teacher’s directions; if not, activity will be unsuccessful.
- It can get messy, so try to keep everything on the newspaper.
Session Instructions:
- Cornstarch & water experiment
- Engage students in discussion through inquiry.
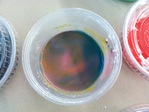
- Have students express their mood through color by using food coloring to dye cornstarch and water mixture.
- Have students experiment with various consistencies (thick, gooey) by adding more or less water.
Mini-Lesson & Create
Connect and cite one example:
- How household materials can be used to make cool things like slime or play dough.
- Colors can make us feel different ways and can be used to express our moods.
Say what you’re going to teach:
- Today I am going to teach you how to make goo and something similar to play dough.
- To do that, we are going to experiment with cornstarch and water.
- We will then use food coloring to dye our mixture to express how we are feeling.
Teach:
- Demonstrate how to mix cornstarch and water, showing them the various consistencies while verbally stating each step.
- After demo, have students (a couple at a time) grab a set of materials from the station and return to their seats and wait patiently for the rest of the class.
- Students will draw cornstarch + water = what they think the mixture will look like.
Active Engagement (10 mintues):
- Discussions through inquiry about their observations and predictions.
- Students will predict what they think the mixture of cornstarch and water will look like, and draw it out.
- Students will create their own mixtures of cornstarch and water.
- Students will draw what their own mixture of cornstarch and water looks like.
Create (30 minutes):
- Students will create their own cornstarch and water mixture.
- Teacher will go around class and put a scoop of cornstarch in each student’s cup.
- “Feel the cornstarch. What does it feel like?”
- Teacher will go around class and put a little bit of water in each student’s cup.
- “Mix it with your fingers. What does it feel like now? How is it different from before we added the water?”
- Teacher will add more water and have students mix it.
- “What happens when you add just a little bit of water? More water?”
- Using your finger or toothpick, tap it quickly, and fast! “What happens?”
- Let your finger or toothpick sink in, mix it slowly. “What happens?”
- Swish it around in the cup. “What does it look like? What does it remind you of?”
- Once they have the desired consistency, students will pick a color that represents their mood.
- They will use food coloring to dye the mixture the color of their mood.
- If color of mood is not red, yellow, green, or blue, student must mix colors to achieve the desired color.
- Draw what your final mixture looks like.
Closing
Closing reflections “What did you think about this activity/experiment?” “What did you learn?” “Like/didn’t like?” (Class Discussion).
Materials— cornstarch, water, small cups, newspaper, toothpicks, food coloring, paper towels, measuring spoon, water dropper
Workshop/Lesson: Magic Mud
Time: 45 minutes
Special Student Considerations: Students have autism or specific learning disabilities.
Standards: F.A.2.1.2: Use color to convey mood in works of art. F.A.3.1.3: Use observational skills in creating an original work of art.
Before Class: Prep a set of materials for each student (cup, newspaper, & toothpick). Teacher: food coloring, paper towels, measuring spoons.
Introduction & Session Instructions
Introductions & Greeting:
- Set up station with sets of materials ready for students to receive once ready to begin activity.
- Pass out worksheet with instructions to students.
- Introduce materials students will receive: a cup, a sheet of newspaper, and a toothpick to each student.
- Inform them that it is for the activity we will do.
- Instruct them to carefully follow teacher’s directions; if not, activity will be unsuccessful.
- It can get messy, so try to keep everything on the newspaper.
Session Instructions:
- Cornstarch & water experiment
- Engage students in discussion through inquiry.
- Have students express their mood through color by using food coloring to dye cornstarch and water mixture.
- Have students experiment with various consistencies (thick, gooey) by adding more or less water.
Mini-Lesson & Create
Connect and cite one example:
- How household materials can be used to make cool things like slime or play dough.
- Colors can make us feel different ways and can be used to express our moods.
Say what you’re going to teach:
- Today I am going to teach you how to make goo and something similar to play dough.
- To do that, we are going to experiment with cornstarch and water.
- We will then use food coloring to dye our mixture to express how we are feeling.
Teach:
- Demonstrate how to mix cornstarch and water, showing them the various consistencies while verbally stating each step.
- After demo, have students (a couple at a time) grab a set of materials from the station and return to their seats and wait patiently for the rest of the class.
- Students will draw cornstarch + water = what they think the mixture will look like.
Active Engagement (10 mintues):
- Discussions through inquiry about their observations and predictions.
- Students will predict what they think the mixture of cornstarch and water will look like, and draw it out.
- Students will create their own mixtures of cornstarch and water.
- Students will draw what their own mixture of cornstarch and water looks like.
Create (30 minutes):
- Students will create their own cornstarch and water mixture.
- Teacher will go around class and put a scoop of cornstarch in each student’s cup.
- “Feel the cornstarch. What does it feel like?”
- Teacher will go around class and put a little bit of water in each student’s cup.
- “Mix it with your fingers. What does it feel like now? How is it different from before we added the water?”
- Teacher will add more water and have students mix it.
- “What happens when you add just a little bit of water? More water?”
- Using your finger or toothpick, tap it quickly, and fast! “What happens?”
- Let your finger or toothpick sink in, mix it slowly. “What happens?”
- Swish it around in the cup. “What does it look like? What does it remind you of?”
- Once they have the desired consistency, students will pick a color that represents their mood.
- They will use food coloring to dye the mixture the color of their mood.
- If color of mood is not red, yellow, green, or blue, student must mix colors to achieve the desired color.
- Draw what your final mixture looks like.
Closing
Closing reflections “What did you think about this activity/experiment?” “What did you learn?” “Like/didn’t like?” (Class Discussion).
Materials— cornstarch, water, small cups, newspaper, toothpicks, food coloring, paper towels, measuring spoon, water dropper
"Join the Tree" Team
Teacher: Jo Anne Sula
Workshop/Lesson: “Join the Tree Team” Source: Teaching Kids to Care by DoubleTree http://teachingkidstocare.doubletree.com/wp-content/uploads/2012/03/04182012_TKTC_LessonPlan-K-2_Lesson_2.pdf
Time: 45-60 minutes
Standards: F.A.2.1.1: Use the element of space and the principles of repetition and variety, with a variety of art media.
Before Class: Find picture of tree for students to observe, prepare picture cards of what trees give or do for people, prepare tree-shaped cutouts for each student.
Introduction & Session Instructions
Introductions & Greeting (10 minutes):
· Show students picture of tree.
· Ask them to look at the tree and write or draw pictures about their observations.
· Prompt them with questions:
o What does the tree look like?
o Are there other plants or animals near the tree?
o How do people use the tree?
o What do you like about the tree?
Session Instructions:
· Have students make observations about a tree.
· Discuss the importance of trees to the Earth and the students’ community.
· Discuss the importance of taking care of trees and brainstorm ways students can help care for trees.
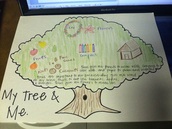
· Students will create a “My Tree and Me” poster that shows what a special tree gives them.
· Students will share their posters with the class.
Mini-Lesson & Create
Connect and cite one example :
· The importance of trees to the Earth and our community.
· What trees give us and do for us.
Say what you’re going to teach:
· Today we are going to learn about trees and how they are important to us, the Earth, and to our community.
· We will come up with ways we can take care of trees to make sure that there are enough in the world.
Teach:
· Show students picture of tree. Have them draw or write about what they see. (Sketch the tree, its leaves, or write words or sentences about the tree.)
Active Engagement (15 minutes):
· Discuss the importance of trees to the Earth, our community, and our lives. Also discuss the importance of taking care of trees.
· Brainstorm ways we can help care for trees and ensure there are enough trees.
Create:
· Students will create a “My Tree & Me” poster that shows all the things important to them that a special tree gives them.
· They will draw pictures of the important things a special tree gives them.
Closing:
· Students will share their posters with the class.
Materials-- Picture of tree, picture cards, “My Tree & Me” posters (tree cutouts), colored pencils, markers
Workshop/Lesson: “Join the Tree Team” Source: Teaching Kids to Care by DoubleTree http://teachingkidstocare.doubletree.com/wp-content/uploads/2012/03/04182012_TKTC_LessonPlan-K-2_Lesson_2.pdf
Time: 45-60 minutes
Standards: F.A.2.1.1: Use the element of space and the principles of repetition and variety, with a variety of art media.
Before Class: Find picture of tree for students to observe, prepare picture cards of what trees give or do for people, prepare tree-shaped cutouts for each student.
Introduction & Session Instructions
Introductions & Greeting (10 minutes):
· Show students picture of tree.
· Ask them to look at the tree and write or draw pictures about their observations.
· Prompt them with questions:
o What does the tree look like?
o Are there other plants or animals near the tree?
o How do people use the tree?
o What do you like about the tree?
Session Instructions:
· Have students make observations about a tree.
· Discuss the importance of trees to the Earth and the students’ community.
· Discuss the importance of taking care of trees and brainstorm ways students can help care for trees.
· Students will create a “My Tree and Me” poster that shows what a special tree gives them.
· Students will share their posters with the class.
Mini-Lesson & Create
Connect and cite one example :
· The importance of trees to the Earth and our community.
· What trees give us and do for us.
Say what you’re going to teach:
· Today we are going to learn about trees and how they are important to us, the Earth, and to our community.
· We will come up with ways we can take care of trees to make sure that there are enough in the world.
Teach:
· Show students picture of tree. Have them draw or write about what they see. (Sketch the tree, its leaves, or write words or sentences about the tree.)
Active Engagement (15 minutes):
· Discuss the importance of trees to the Earth, our community, and our lives. Also discuss the importance of taking care of trees.
· Brainstorm ways we can help care for trees and ensure there are enough trees.
Create:
· Students will create a “My Tree & Me” poster that shows all the things important to them that a special tree gives them.
· They will draw pictures of the important things a special tree gives them.
Closing:
· Students will share their posters with the class.
Materials-- Picture of tree, picture cards, “My Tree & Me” posters (tree cutouts), colored pencils, markers
